The Windows screen recorder is a helpful function that is helpful for many different jobs, especially when creating courses. The Windows 10 screen recorder is an excellent tool for demonstrating to someone how to carry out a task in a crucial application or to showcase your gaming prowess.
Why are Windows 10 gamers, educators, and YouTubers required to record?
For creating films, Windows 10 screen captures are quite useful. Screen recording is definitely something you’re already familiar with if you’re a YouTuber, teacher, or gamer.
Screen recording in Windows 10 is a requirement. This is the perfect ally for your videos, whether you want to convey the most recent trends to your viewers or provide practical advice.
Even if you want to record your activities in a non-gaming application, Windows 10’s Xbox Game Bar tool comes with a screen recording feature that is already built in. You can record your screen using Windows 10’s built-in Game Bar feature.
Although it can record other applications and activities as well, it was developed especially to capture PC and Xbox gaming sessions. You can utilise Wondershare DemoCreator to edit your video and add effects. the screen recorder and video editor together.
Learning how to screen record on Windows 10 is advantageous for a number of reasons, including:
- Monitoring the material on social media
- sharing gameplay hints and videos
- When you wish to conduct seminars or teach courses
- This is useful when explaining technical issues to a computer repair professional.
Anytime you wish to record a screen action to review or share later, screen capture can be handy. You may avoid hassle and save time by using this simple strategy.
How to capture a computer’s screen on Windows 10
On Windows 10, there are several different ways to cast a screen. If you wish to film games or make a tutorial, you can record a video of your actions in almost any Windows application on your laptop. Listed below are some useful techniques to learn about screen recording. Get started now!
1. How to Record the Screen in PowerPoint on Windows 10
Many customers are not aware that Windows computers’ PowerPoint programmes enable for screen recording. Obviously, this isn’t a full-fledged feature, but if you want to record video for your presentation, it’s worth a shot.
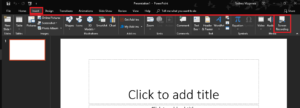
- Launch the Windows 10 screen recorder by selecting the “Insert” tab on any presentation in PowerPoint. Select “Screen Recording” next.
- You are now prompted to select the region you want to record in a control dock that appears. Click “Select Area” before dragging to select an area. To capture the entire screen, use the keyboard shortcut Windows key + Shift + F. Although they are automatically recorded, you can turn them off using the control dock.
- Press the “Record” button once all of your modifications have been completed. By pressing Windows key+Shift+R, you can also start/pause the recording.
- To finish the procedure, press the stop button. A video will now be integrated into your slide. Nevertheless, you are free to save it wherever you like. To save a video, simply right-click it and choose “Save Media As” from the menu. After that, give it a new name and pick your preferred location.
To read our blog on “Microsoft fixed major bug that exposed personal data of Windows 10 and 11 users,” click here