
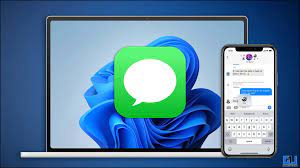
By bringing iMessage to the PC, Microsoft is doing what Apple will not. Here’s what you should know.
If you own an iPhone and a Windows PC, I have great news for you. Microsoft has officially begun rolling out iPhone compatibility to its Phone Link app, allowing you to send and receive iMessages from your PC.
iMessage to the PC
You can also view all of your phone’s notifications and even make or receive calls. A brief testing period precedes the official rollout.
Android users can do much more than that, and have been able to send and receive messages for quite some time.
However, by extending the feature to iPhone users, you won’t have to stop what you’re doing on your computer every time you receive a message.
However, there are a few catches. To begin with, not everyone will have immediate access to the feature.
It is currently being rolled out, which means that some PCs will get it before others. Microsoft did not provide an ETA for when it will be available to everyone.
Because Microsoft is working with what Apple allows for when it comes to iMessage and alert access, keep in mind that you won’t be able to access your chat history, send or receive group messages, or view or send images and videos.
However, it is preferable to nothing. I’ll walk you through how to check for access, what’s required, how to pair your two devices, and, finally, how to send messages using your PC.

How to Send iMessages from an iPhone on a Computer
1. Install any available updates and install the Phone Link for iOS app
To get Microsoft to work its magic and display your iMessage conversations on your PC, download the Link to Windows app from the App Store and sign in with the same Microsoft account you use on your PC.
It’s also a good idea to double-check that your PC’s Phone Link app is up to date. Open the Microsoft Store app, then select Library > Get Updates, followed by Update All if any pending updates are found.
Finally, ensure that all Windows 11 system updates have been installed. To do so, launch the Settings app, navigate to Windows Update, and then click Check for updates.
Install any outstanding updates, reboot your computer if necessary, and then check for updates again. If you haven’t updated your PC in a while, there may be multiple rounds of updates.


2. Link your iPhone to your computer
After updating your PC and the necessary apps, you can connect your iPhone to your computer and begin using iMessage.
Launch both the Phone Link app on your computer and the Link to Windows app on your iPhone.
Your phone will have two options for the Phone Link app: Android or iPhone. Choose iPhone. (If the iPhone is marked as “coming soon,” your account does not yet have access to the feature. Check the app every few days to see if you’ve been granted access.)
Slide out the menu from the left side of the screen in the Link to Windows app on your iPhone and select Pair a new computer at the top of the screen.
Scan the QR code displayed in the Phone Link app on your computer with your phone’s camera. Follow the prompts on your iPhone and PC to finish pairing the two devices via Bluetooth.
After pairing is complete, open the Settings app on your iPhone, go to Bluetooth, and look for your PC’s name in the list of connected devices. Enable Show notifications by tapping the “i” icon.


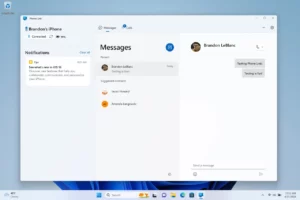
3. Send and receive messages on your PC via your iPhone
Once that’s done, launch the Phone Link app on your PC, and it’ll connect via Bluetooth to your iPhone, allowing you to receive notifications for new messages as well as alerts from your iPhone apps directly on your computer.
You won’t be able to see older conversations or messages; it will only show you what was sent or received while the app was open and a connection was active.
You will also be unable to send or receive images, and group messages will not function. You’ll still need to use your iPhone to complete those tasks.
Aside from those two major caveats, you can now send and receive messages – both iMessages and text messages – from your iPhone directly from your PC, which was previously not possible.
In a Tesla, this is similar to how sending and receiving messages on an iPhone works. There is no chat history, and group messages are not available, but it is better than nothing. And, to be honest, it’s past time for Microsoft to figure out how to make it happen.
To read our blog on “How to run Android 14 beta version easily on Nothing Phone 1,” click here