
Do you want to use your Oculus Quest 2 headset to take screenshots? Screenshots and video recordings are excellent ways to share your virtual reality experiences with the rest of the world.
Fortunately, you can easily capture screenshots and video recordings with the Oculus Quest headset’s Share feature.
- Capturing a Screenshot
Press and hold the Oculus Home button. It’s a flat button with an extended “O.” It is on the correct controller. The Home menu bar appears at the bottom of your screen.
- Choose the Sharing option
It’s a pink button with a right-pointing curved arrow. It can be found in the Home menu bar. This brings up the Sharing menu. To select an option, use either controller to point to it and squeeze the trigger.
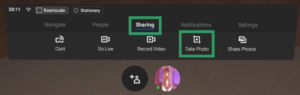

- Choose Take Photo
It’s the button in the middle of the Sharing menu. A 5-second countdown will begin. A red dot will flash in the upper-right corner of your vision. This allows you to resume your activity.
When the red dot is about to take a picture, it will begin to flash faster. After the red dot stops flashing, a screenshot will be taken.


- Simply press the Oculus button on the right controller again to remove the Home menu bar and resume your activity.
- You can also use the Oculus Sharing menu to record a video or cast it to a smart TV, computer, or Oculus App.
To read our blog on “Oculus Quest 2 will be launched in the UK by Meta Horizon Worlds,” click here